This web page is about the construction techniques and tools employed for the scenery of my TT scale model railway.
Contents:
Landscape
The employed substrate to model the landscape shall be cheap, light and easy to model.
Rocks
Bark is used as a substrate of rocks.
The modelling involves the following steps ...
Hills
Papier mâché is used as a substrate for hills. A few scopes of salt is added to prevent mould.
The modelling involves the following steps ...
Trees
Water ways
Roads
Structures
Viaducts
This section is about the construction techniques and tools employed for the viaduct at the back of module 2 of my TT model railway. The viaduct resembles the in 1999 abandoned 'Laskitzer Viadukt' of the Tauernbahn.
Prestressed concrete bridges
Tunnels
Airbrushing
Airbrushing tools are an amazingly useful and versatile for any modeller to have. The key to mastering airbrushing is to understand the relationship between the air pressure, the thickness of the paint, and the type of airbrush you are using.
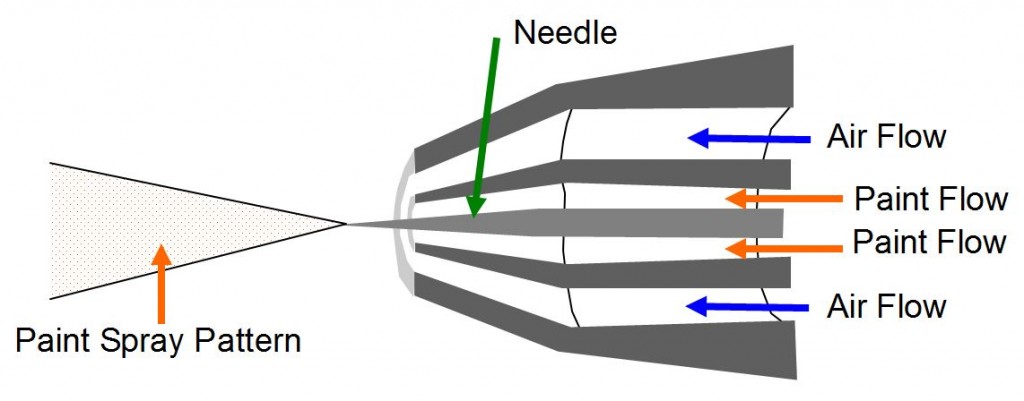
Here is a basic diagram to show how an airbrush works.
The above diagram shows how paint particles mix with air pressure. The pattern can be altered by adjusting the movable needle backward or foreward.
Airbrush paint
The important point is to mix your paint to an inky liquid consistency so it doesn’t block the airbrush. Acrylic paints can be thinned with water. Inks can be used on some projects and they won’t usually require thinning. When diluting acrylic paints add only two or three drops each time until you get the consistency right. It is easier to add more water, but once you have added it you can’t take it away.
Adjust the paint type depending on the surface you are covering. Some paints are more flexible and less prone to cracking or damage than other paints. As an example; a less pliable and harder paint might work better when airbrushing on a metal surface.
Double-action airbrushes
A double action airbrush gives more control over a single action airbrush as you can adjust the air volume and paint separately.
Depending on the brand and type you use, you might choose to try different needles for different jobs.
Airbrushes vary a little in how the paint in stored. Some use jars attached under the airbrush and others use little bowls to hold the paint at the side of, or above, the airbrush.
Compressor with air cylinder
The air source needs to be reliable. Some people buy the air in small air propellant cans, others use a compressor, and some people even use an old car tire to dispense the air. An air source delivering 100 PSI at a constant rate is usually what’s required.
Testing airbrush techniques
Before getting started on a model train shell or airbrushing some scenery, it is wise to test your techniques and your paint consistency on a piece of scrap paper. It is a good idea to practice pressing the button control on the airbrush. It might save you from having to wipe the model clean and start over again if you make a mistake. You will be able to adjust the needle on the airbrush so that it doesn’t quite touch onto the cap, but still allowing just enough space for air to escape. The airbrush will need to be about 200mm from the surface you are spraying.
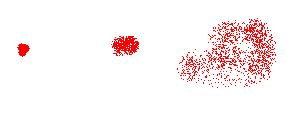
Atomisation
Practice, practice, practice! Get to understand how to control “atomisation.” I know it is a fancy name, but it basically relates to how fine the paint particles are when sprayed. A higher pressure will result in finer paint atomisation. There are several 'Youtube' videos to explain techniques. Understand how the type of paint and consistency will affect the atomisation process. Try out using various paint types and consistencies to determine what works best for you. Thicker paint will require more air pressure for the paint to flow freely, whereas thinner paints (and inks) will flow easily with a lower air pressure. Adjusting the button (on the top of the airbrush) will usually provide some control of the air pressure. If paint Splutters out of the airbrush it usually means it’s too thick.
When using a finer needle a thinner paint consistency will be needed. A lower air pressure of perhaps 15 to 40 PSI may work best for high precision work like this.
Below some examples of Airbrush atomisation.
Different effects can be achieved by altering the paint consistency, air pressure, movement and distance of the airbrush from the object being sprayed. Let the paint dry for an half hour between different colours.
Over spraying
Take care not to “over-spray” when using an airbrush. Horizontal stroke movements can be applied when applying the first coat of paint. After leaving it to dry a second coat or different colour can be applied maybe using a vertical stroke movement from three or four feet away. For weathering structures or scenery a subtle build up of paint layers and colours usually looks best. Complete several passes of your airbrush to create the weathering effect as opposed to applying just one thick layer. In real life, grime and dirt on a structure will usually build up over years, so airbrush weathering needs airbrush masking to replicate that process by building up multiple thin paint layers (grime and dirt) using the airbrush.
Airbrush cleaning
Any airbrush if it’s to operate effectively needs to be kept in “as new” condition meaning it must be kept spotlessly clean. Paint will harden if left inside the mechanism and it will cause blockages and affect the paint flow. For this reason special care needs to be taken between projects to ensure the airbrush is returned to the condition it was before it was used. The jar or bowl can be removed and soaked in water for cleaning. Blowing air through the airbrush will help wash out any paint left in the mechanism. It will also stop colours from intermixing if dregs of the last used colour are still inside the airbrush. The airbrush should also be clean of any water before adding new paint to the bowl or jar dispenser. Just blow it out onto a rag. Cleaning the airbrush immediately after use will prevent many problems. When taking the airbrush apart remember to take care with the needle as that is usually the most fragile part of the mechanism.
Airbrush paint layers
Although there are no hard and fast rules with airbrushing, it is generally best to build up the color layers one layer at a time usually starting with lighter colours first, gradually adding darker colours.
Airbrush troubleshooting
The solution for problems could be one of the following.
Rough paint finish due to the paint drying to quickly:
Air pressure too high
Airbrush too far from subject
Paint too thick
Nozzle may be blocked or not of the right size
Paint spatters:
Paint may not be properly thinned
Nozzle may be clogged
To quickly release of the trigger
Needle may be damaged.
Runs and puddles:
Paint too thin
Spraying too close to the surface
The paint control may be lose hence spraying too much paint at once
Airbrush not kapt moving during spraying.
Paint creeps out in a spider effect:
Airbrush too close to the subject
Paint too thin
Air pressure too high.
Bubbles appearing in the paint cup:
Fluids paths or nozzle may be blocked or restricted causing blow-back into the cup
Needle lock nut may be too loose.
Dumb-bell shaped lines:
Airbrush remaining static at the beginning and end of sweep.
No paint emerging:
Nozzle or fluid paths may be blocked
Air supply, connectors and valves may misbehave
Breather hole of the paint cup may be blocked
Amount of paint may be insufficient (in case of an a siphon airbrush)
Air pressure may be too low.
No air:
Air source may be off or or the gas cannister not charged
Air hoses, connections and valves are not connected or leak air
In proper installed trigger airbrush.
Airbrush tools
The part list with airbrush tools is shown below.
ID
Component
Properties
Qty.
BD-778
Fengda Cleaning set
1
FE-183K
Fengda airbrush pistool set with nozzles 0,3, 0,5, 0,8 mm